#3: Roasted Asparagus with Balsamic Vinegarette

Tags

, , ,

Last post of this wonderful three part series is one of my favorite vegetable side dishes! Sweet…simple…and quick to make! It’s a very good side dish or a quick snack for lunch time. I find myself opening up the fridge and grabbing a stalk and munching on that…and quickly returning to the fridge for another. So let’s finish off this series of with the roasted asparagus, shall we?


Ingredients:

Asparagus, each stalk cut in thirds

1 tablespoon butter

1 tablespoon balsamic vinegarette

Pepper


Directions:

1. Preheat oven to 400 degrees. 

2. Clean the asparagus and cut the stalks into thirds

3. In a small oven friendly pan, place the asparagus in with butter and pepper sprinkled on top. 

Image

4. Cover with aluminum foil.

5. Place in oven for 20 minutes.

6. When cooked through it will be a light green and soft to the touch. Drizzle balsamic vinegar on top.

Image


Well that wraps up this three part series of dinner ideas! I hope you enjoyed it as much as I did. Bon appetit!

Image


#2: Pan Seared Chicken with Cream Cheese Mushroom Sauce

Tags

, , , , ,

If you continue to read this blog, you’ll quickly find out how much I love mushrooms! So this sauce is an easy and delicious addition to any protein, but I love it on chicken. I like using cream cheese as a thickening agent; especially right now when I have so many extra blocks of cream cheese (I forgot to make 2 desserts and had an extra 4 blocks).

Pan Seared Chicken

Ingredients:

4-6 medium sized, skinless chicken breasts

Salt and pepper, to taste

Large skillet


Directions:

1. In a large skillet, spray with Pam and allow it to get warm on Medium-High heat.

2. Place chicken on the skillet and sprinkle with seasonings.

3. Flip every 5-7 minutes so as not to burn any one side.

**Do not pierce the chicken! This will let the juices run out and make the chicken dry.


Cream Cheese Mushroom Sauce

Ingredients:

1 cup chicken broth

1/4 oz. cream cheese

1/2 cup sliced mushrooms

Coarse sea salt (1/4 tsp)


Directions:

1. In a small sauce pot, pour in chicken broth and allow it to come to a slow boil on Medium heat (about 2 minutes)

2. As the chicken broth warms, add the cream cheese and let it melt down stirring occasionally.

3. Add mushrooms and sea salt. Continue to stir.

4. Turn heat to low and simmer.

5. Once chicken is done, pour sauce over chicken before serving.

Image

20140429_193449


Guest Post!!!

Tags

, ,

I am excited to announce that a great friend of mine will soon become a guest poster on my blog. She has some amazing recipes. Since I don’t eat nuts, seafood, and barely bake desserts she is a great addition to this blog and can fill in all the holes that I have left out of my diet! I really hope that you enjoy her food as much as I do.

Mini Pigs in a Blanket

Tags

, , , , , ,

Sometimes I have a moment when I feel like a kid. When that happens, I have serious cravings for some of the good food I got to enjoy as a kid with no judgment. Well pigs in a blanket have always been a personal favorite. How can you beat it? A hotdog wrapped completely in bread instead of dumped in it? It’s amazing and delicious and so I made some to feed my craving.


Ingredients:

Turkey Lil Smokies

Pillsbury Crescent rolls

Italian seasoning

**Shredded cheese (Optional)


Directions:

1. (Optional) In a large skillet, lightly sauté Lil Smokies. They come in the bag pre-cooked, but I like recooking to be sure.

Image

2. Open all rolls and slice in the middle vertically.

Image

3. Sprinkle Italian seasoning and cheese on each crescent.

4. Wrap a Lil Smokie in the roll and place on a baking sheet.

Image

5. Follow the instructions on the Pillsbury wrapper to cook (375 degrees for 12-15 minutes).

**Can serve with dipping sauces

Image

Bacon Wrapped Turkey Burger

Tags

, , , ,

While I was grocery shopping one day, I saw a pack for for frozen bacon-wrapped filet mignon burgers. I got ready to grab them and my gut told me to look at the nutritional facts. 1 serving had close to 900 mg of sodium! I’m not sure if its from the salt from the bacon or the sodium used to keep the frozen food “fresh”, but I immediately put the bag down. I looked at my husband and told him to help me find the ingredients before we left the store because now I was set to make this for lunch. Thankfully, it ended up being a pretty quick and easy meal to make! And trust me, 1 serving does not have 900 mg of sodium. The recipe below makes about 6 medium-sized burgers.

Ingredients:

1 pound ground turkey

12 strips of turkey bacon

1/4 cup sliced mushrooms

1/2 cup diced red bell pepper

Toothpicks

Sliced cheese

Seasonings of your choice (I used Mrs. Dash Italian Herb and Table Blend)


Directions:

1.In a large skillet, cook strips of turkey bacon. Once finished lay out on paper towels to soak up any grease.

2. In a large bowl, mix ground turkey, mushrooms, bells peppers and seasonings. Mix together well.

3. Spoon a palm-sized helping onto a spoon and form into ball.

4. Wrap 2 slices of turkey bacon (or however many is needed to cover entire circumference) around the uncooked burger and pin with toothpicks on each end.

5. Place burgers on a warm skillet, ensuring to cook well on both sides. Flip often. Turkey should be at 165-170 degrees to be considered safe for consumption.

6. Once meat is cooked, place a slice of cheese on top for about 2 minutes to allow it to melt.

7. Make your burger and enjoy!

ImageImageImageImageImageImageImageImageImage

Mixed Potato Casserole

Tags

, , , ,

Grad school is no joke. For the past three months I have been slaving behind books and my computer more than I’ve had the chance to slave in the kitchen. However, I have had the chance to make some new delectable meals that I can’t wait to share with you! So let’s start my summer break off right! This recipe is for a mixed potato casserole including Yukon gold and Russet red potatoes.

Ingredients:
3 medium-sized Yukon gold potatoes, sliced thinly
3 medium-sized Russet red potatoes, sliced thinly
1/2 pound of ground turkey
1 can of tomatoes
1 cup chopped spinach
1/4 onion, diced
1/2 cup sliced white mushrooms
Rosemary
Sea Salt
1 1/2 cup shredded cheese

Directions:
1. Set oven to 400 degrees. Slice all potatoes and spread on a tray. Sprinkle potatoes with sea salt and rosemary. Cook in oven for 30 minutes.

Image
2. Cook ground turkey thoroughly in deep skillet.
3. Once meat is cooked, drain any excess oil.
4. Mix in stewed tomatoes, spinach, onions, and mushrooms.
5. Once potatoes are done, place single layers of potatoes in casserole dish. Spoon meat mixture on top. Continue the layers until all ingredients have been used.

6. Sprinkle top with cheese and cover with aluminum foil.
7. Bake on 325 degrees for 20 minutes.

This is a simple meal that is filling and really good. Hope you enjoy! Image

Image

Healthier Creamy Mac & Cheese

Tags

, , , , ,

Coming from the mouth of a lactose intolerant kid….I LOVE mac and cheese! I could not make this frickin’ meal for years! I don’t know, it just always escaped me how to get it just right! My older sister was a whiz at it and I devoured hers. Well after A LOT of practice and tweaking of the ingredients I’ve finally got it down where I can share it with you! I personally don’t like elbow macaroni noodles. They look funny to me. I like using shell pasta so my cheese gets “captured” into each noodle. I still rep the Weight Watcher’s shredded cheese! And we are going to make a cheese sauce! (Something about the word “cheese sauce” just sounds glorious to me.) Ok, let’s get started!

Ingredients: (This recipe is when you are making it for a large group of people. Feel free to cut down on the sizes of all ingredients if just making it for a smaller meal. This recipe typically makes two pans worth of mac and cheese.)

1-2 boxes of shell macaroni

5-6 tablespoons of butter

5-6 tablespoons of flour

24 oz. Evaporated milk [try the Fat Free] – This is just (2) 12 oz. cans!

Coarse sea salt

Thyme

Italian Seasoning

CHEESE!!!! (I use about 2 pounds if making this for the holidays! which would be about 12 people)

Instructions:

1. We have to start boiling our noodles. While boiling, spray a large casserole dish with Pam.

2. You’ll also need a large skillet or wok to make the cheese sauce. I make it in layers so there will be some repeating in some of the following steps.

3. Once the noodles are done, drain in a colander and rinse with cold water to keep the noodles firm. Also, set your oven for 350 degrees.

4. Now for the cheese sauce! In your large skillet, melt 1 tablespoon of butter. Once melted, place 1 tablespoon of flour and 4 tablespoons of evaporated milk and whisk together. Sprinkle about 1/4 cup of cheese and whisk again.

Image  Image

5. Place about 2 large spoonfuls (serving spoon size) of noodles into the cheese sauce. Season with a small amount of Sea salt, Thyme and Italian seasoning and stir together. Pour this layer into the casserole dish and sprinkle with a nice helping of cheese on top.

Image   Image

6. Repeat steps 4 and 5 until all of your noodles have been used. You should only use 1 can of evaporated milk for these steps above. I also like to spray the skillet with Pam between each layer because after a while the butter doesn’t prevent sticking as well. In order to finish these steps, I typically repeat about 5-6 times.

7. Once you’ve finished all the layers and you sprinkled cheese on top, pour the 2nd can of evaporated milk all over. I also like to sprinkle a little more Italian seasoning on top. Bake uncovered for about 20-30 minutes.

Image

Rotini Pasta with Meatballs

Tags

, , , , , , , , ,

OMG!  Have you ever walked into the kitchen determined to make something good and then you wow yourself? Well this was definitely my moment. All the pieces of this recipe I had worked with before, but for the most part, not in this way. Anyway, the finished product came out better than I had expected. I used some healthier ingredients since I was making pasta and the changes were spot on. It does take a little more time to get this one finished, probably about an hour total to cook with about 15-20 minutes of prep work, but I guarantee you that it is worth it.

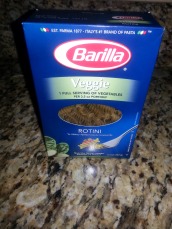
Side Note on the Pasta: You can use whatever type of pasta your hungry heart desires! I have fallen in love with Barilla Veggie Pasta! The Rotini noodles are zucchini and spinach and soooooo good. They work well with pretty much everything, especially this meal!

Image  Image


Ingredients:

Meatballs

1 pound lean ground turkey

1 1/2 cup egg whites

1/4 cup Ketchup [organic if you have it]

Mrs. Dash Italian Medley

Coarse Sea Salt

2 cups bread crumbs [one with low sodium is preferable. I’ll post my recipe for bread crumbs this week]

Meat Thermometer


Cream Sauce

3 cups low sodium chicken stock

1 tablespoon butter

2 cups sliced mushrooms

Mrs. Dash Garlic & Herb

1 cup wheat flour [broken into 1/4 cup increments] (We use wheat or almond flour. If you have regular flour that’s fine too!)

2 cups milk [I use soy milk but you can use whatever you drink]


Noodles

Barilla Veggie Pasta

3 cups broccoli, chopped

1 tablespoon olive oil [optional – See Step 7]

2 cups fresh spinach, chopped

Shredded cheese [optional – I use Weight Watcher’s cheese…can I hear it for 2 points! Yay!]


Instructions:

1. Start with the meatballs since that takes the longest. Set your oven to 400 degrees.Line a large sheet pan with aluminum foil and spray with Pam.

2. Take a large mixing bowl and combine all of the meatball ingredients and mix well. 

3. Once the meat mixture has been mixed thoroughly, begin forming medium-sized meatballs with your hands. They should fit the pit of your palm. Place the meatballs onto the pan. When finished place in the oven on the middle rack and set your timer for 30 minutes.

4. Now for cream sauce! Pour in chicken stock into a large pot and set on MEDIUM-HIGH. Let the stock get to a rolling boil.

5. At the same time put your butter into a skillet and turn on medium until it melts. Then add the mushrooms and lightly sautee. Set aside for the moment.

6.Pour about 1/4 cup of your flour into the large pot of chicken stock and whisk. This is just to help thicken it up a bit. Let it keep boiling.

7. If your broccoli is frozen you will want to sautee them quickly before the next couple steps. I prefer to sautee them with a dash of olive oil and no seasonings. If your broccoli is fresh, then you use your own discretion.

8. Pour another 1/4 cup of flour into the chicken stock and whisk.

9. At this point your meatballs should be near done with its first round. Take them out and flip them over. Be sure to check the temperature of the meatballs before putting them back in. At the halfway point they’re normally in the 130-150 degree range. They need to be at 170 degrees to be safe to eat. Place the meatballs back in and set your timer for 25 minutes.

10. Now pour the remaining 1/2 cup flour into the chicken stock pot. Also add the milk and Mrs. Dash. Whisk until you cannot see any flour.

11. Begin boiling your noodles in a pot of water. If you want leftovers, I suggest making the whole box of pasta. I’m only feeding 2 people and we had enough for about 8-10 servings because of our portion sizes. Mind you, my husband’s portion sizes are about 1/3-1/2 larger than mine so make what you think you’ll eat.

12. Add the mushrooms into the chicken stock pot and cover and just let simmer on LOW.

13. When the noodles have cooked strain them using cold water. The cold water helps them keep their form and not break when added to other mixtures.

14. Combine the noodles and broccoli into the large pot of chicken stock cream sauce. Turn the eye OFF for now and cover.

15. When the meatballs are finished and you’ve checked that they are at 170 degrees take them out of the oven and place into the noodles mixture. Turn the eye back on LOW. Add the chopped spinach and stir gently. Let the flavors mix together for about 5 minutes.

16. When you’re ready to serve, spoon a nice helping into your bowl and sprinkle with some shredded cheese! Bon Appetit!

Image

Heaven In Your Mouth / Raspberry Delight Dessert

Tags

, , , , , , , , ,

Have you ever had that one dessert that you learned to make years ago and don’t remember where you got the recipe? Well this is mine! It is one of my favorite desserts and tastes so darn good. I’ve made it for BBQ’s, 4th of July, Christmas parties, birthday parties, just because parties, etc. I’ve added various berries on top but the favorite seems to be raspberries, but you can also use blueberries or strawberries. When I made this for the 4th of July, I made it into an American flag just to be festive. So take this recipe and have fun with it!


I also feel that I have to explain the names. So after I made it for 2 different church parties (upon my husband’s request) I asked for help in coming up with a name. The first night, someone said it tasted like “heaven in his mouth”. My husband thought that was hilarious and began using that term at every possible moment. The following night at another party when I asked for help in coming up with a name, one person mentioned “Raspberry Delight’ which I felt was quite fitting. However, my husband decided to rebirth the “heaven in your mouth” name. “Raspberry Delight” was quickly forgotten and the ongoing joke of tasting “Heaven in your mouth” was officially born. So as I post this, I figured it’d be wise for me to include both names. But feel free to rename it for your parties. If you come up with a better name, please let me know in the comment section!

Another note about this recipe is below I’m including the lighter calorie version. Feel free to purchase the non-light types of each ingredient. It tastes the same, but please make it as you see fit. Try to make this at least 5 hours before serving so everything has time to set.  I typically make it the day before I need it. I hope you love it as much as we do!

Ingredients:

Crust

3 cups graham cracker crumbs (Can also use regular graham crackers and crush them)

1 cup light butter, melted


Pie

4 8-oz. cream cheese, light (must be soft)

1 can regular Whipped cream

1 8 oz. tub of Light Cool Whip

1/2 cup of white sugar

4 tablespoons Vanilla Extract


Topping

2-3 cups of sliced fresh berries

2 tablespoons sugar


Directions:

1. Make the crust first. Melt the butter and mix in a large bowl with the bread crumbs.

2. Press the crust mixture into the bottom of a 9 x 13 cake pan.

3.Clean off your berries and slice them. I typically cut my raspberries into quarters. Spread the berries on a layer of wax paper and sprinkle 1 tablespoon of sugar. Put in the fridge so they can dry out a bit. If you’re making this the day that you’re serving it, you can just put them off to the side on your counter until you serve it.Image

4. Pie time! Make sure your cream cheese is softened. Normally you need to take it out of the fridge about an hour before you get to this step. Place all the cream cheese into a large mixing bowl and mash together.

5. Add the 1/2 cup of sugar and vanilla extract. Mix everything together well.

6. Mix in the tub and can of cool whip. Fold everything together well. I like to do both because it adds a different layer of consistency that mixes really well. Also, you can use less white sugar because the whipped cream has it already. Lastly, it saves you money! Now who doesn’t like that?

7. Once everything is mixed together well, pour on top of the crust and smooth across. Cover with cling wrap and place in the fridge for about 3-5 hours.

Image

8. About 20-30 minutes before serving, take the berries out of the fridge and set out so they can dry out. You may need to pat them dry. Once they’re dry, sprinkle another tablespoon of sugar on top.

9. Slice your pie into bite-sized pieces. Typically, I end up with about 30 squares. (6 rows, 5 columns)

10. Spoon your berries on top and serve! If you have any extra whipped cream, squeeze some on top as you’re serving.

Image

Image

Parmesan Chicken

Tags

, , ,

When my husband invited missionaries over for dinner, I knew I had to make some meat that was easy to make and that didn’t require a lot of work. Well, when I decided to make my parmesan chicken, I kind of ignored both aspects, but it was a definite win. I made 32 pieces of chicken thighs and by the end of the night I had 3 pieces left over. Now, when you make this for a large group of people, it definitely takes more work. I like to use boneless, skinless chicken thighs because they’re healthier and harder to dry out. The only reason it took me longer than expected to make is because I like to trim all the fat off and clean them thoroughly. So how do you make this marvelous, delectable dinner item? Here’s what you’ll need.

Ingredients:

Boneless, skinless Chicken thighs

2 cups bread crumbs

1 cup Parmesan cheese

Seasoning salt

Instructions:

1. Clean off the meat and pat it dry. You want it to be dry so it will collect the bread crumbs.

2. Pour some water into a separate bowl.

3. Mix bread crumbs, parmesan cheese and seasoning salt into a separate bowl. Make sure your bowls are large enough for the chicken pieces to fit in comfortably.

4. Preheat you’re oven to 400 degrees. On a large pan, spread aluminum foil across it and spray with Pam.

5. Take a piece of chicken and dredge in water on both sides. Then place in breadcrumb mixture. Once fully coated place on the pan.

6. Repeat for all pieces of chicken until complete.

7. Place the chicken in the oven on the middle rack. Set your timer for 12 minutes.

8. When the timer goes off, flip the chicken over and set your timer for another 12-15 minutes.

9. When the timer beeps a 2nd time, take the chicken out and check the temperature with a meat thermometer. The chicken should be at 170 degrees to be cooked thoroughly.

To make this a lighter fare, use the Light, Less Fat Parmesan Cheese.

Image